Why a Fire Pit Is Worth It
A budget friendly fire pit instantly elevates your outdoor space. It’s more than just a design feature it’s a functional hub for relaxation, entertainment, and seasonal comfort. Here’s why building one is worth the effort:
Warmth, Style, and Utility in One
Adds warmth: Extend your time outside on cool evenings.
Boosts style: A fire pit anchors your yard visually and thematically, adding rustic charm or modern appeal depending on the materials you use.
Improves function: It becomes a natural gathering point without requiring major additions to your backyard setup.
Designed for Real Life Moments
Host small gatherings: Fire pits are perfect for creating a cozy atmosphere with friends and family.
Relax solo: Enjoy quiet time with a book or a hot drink by the fire a simple luxury that doesn’t require leaving home.
Year Round Enjoyment Without the Cost
Extend seasonal use: Spend time outdoors even during chilly spring or fall evenings.
No need for a big budget: With affordable materials and a weekend of DIY work, you can build a feature that looks expensive but stays within your means.
Planning Your Ideal Fire Pit Setup
First thing: location makes or breaks your fire pit. Keep it at least 10 feet away from your house, fences, sheds, and low hanging tree branches. You want a spot that’s open enough to stay safe, but sheltered enough to block strong wind. Bonus points if it’s walkable from your back door and near some natural seating areas.
Before you grab a shovel, check your local codes. Some towns require permits, especially if you’re using gas or building with permanent materials. Others don’t allow open flames at all. Skipping this step can cost you more than a fine it could mean tearing your setup out.
Shape and size are up next. Round is a classic it promotes conversation and disperses heat evenly. Square works well in smaller yards or modern designs. Want to go custom? Just make sure it fits your furniture layout and people won’t be tripping over it.
Your fire pit doesn’t just stand alone it anchors the whole outdoor vibe. Think of it as the centerpiece to build an experience around. Seating, lighting, and textures all flow from here. For deeper ideas on creating your full setup, check out our outdoor lounge guide.
Materials That Save You Money Without Sacrificing Style
Getting a beautiful fire pit doesn’t mean bleeding your wallet. Some of the smartest builds use basic, budget conscious materials that still look great and hold up well. Pavers and retaining wall blocks are two go tos they’re easy to stack, widely available, and designed to withstand heat. Gravel gives your fire pit area a finished look and helps with drainage without costing much.
But not all cheap is good cheap. Avoid ultra thin bricks or off brand concrete blocks that crack in the first season. If something feels flimsy in your hands, it probably won’t hold up to fire and weather. Stick with materials rated for high temperatures or outdoor use.
As for sourcing, start close to home. Local hardware stores often have end of season deals or bulk discounts if you ask. Online salvage markets and community boards like Craigslist or Facebook Marketplace can be goldmines for leftover building materials. And don’t overlook upcycling old bricks, stones, and even thick metal parts from other projects can breathe new life into your fire pit design without costing a dime.
Step by Step: Building a Basic Stone Fire Pit
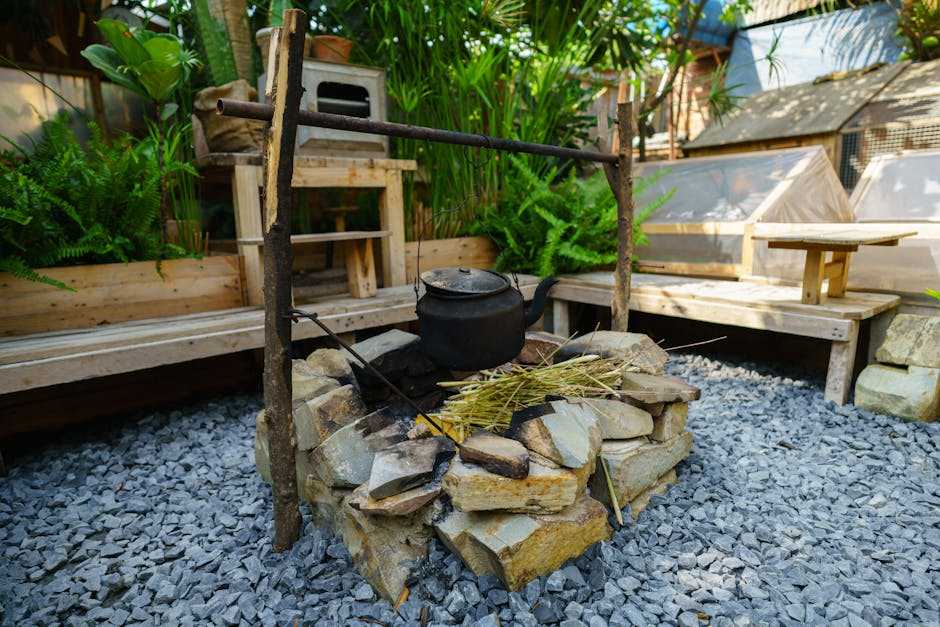
Start by picking your spot. Flat, open ground away from overhanging branches and nearby structures is ideal. Use spray paint or a stake and string setup to clearly mark the outline of your fire pit. Round is classic, but go with whatever shape suits your space.
Once marked, dig down about 6 inches to clear out grass, roots, and topsoil. Use a level and a hand tamper to make the base as even as possible. Then pour in 2 to 3 inches of gravel to help with drainage and stability skip this and you may regret it after a few rainy nights.
Next comes the foundation. Lay out your first ring of stones tightly, checking level as you go. This first layer sets the tone, so don’t rush. Once you’re satisfied, stack the next layers, staggering seams like a brick wall. Dry stacked blocks work fine for casual setups; use construction adhesive for extra durability if needed.
With the outer wall done, fill the pit’s interior with lava rock or fire rated brick to handle high heat. Avoid using regular stone or concrete inside they can crack or even explode under flame.
Before lighting your first fire, run through a quick checklist:
Are the walls stable and level?
Is there at least 10 feet of clearance in all directions?
Did you skip any flammable materials?
Gravel still solid? No sinking or gaps?
Once it all checks out, you’re good to go fire up and enjoy.
Safety Tips You Can’t Skip
A fire pit is a simple pleasure but a little planning keeps it from turning into a hazard. Start by placing your fire pit at least 10 feet away from your house, fences, trees, and any combustible materials. That includes overhanging branches and patio furniture with fabric or cushions. If you’ve got limited space, go for a smaller pit to maintain distance.
Ventilation matters, too. You want airflow to feed your fire, but not so much that it strips away the heat. Avoid building in deep pits or walled off corners. A low windbreak like a couple of chairs or planters can help block gusts while keeping the warmth concentrated.
When it’s time to put out the fire, don’t just let it burn down. Spread out the ashes with a shovel or poker, pour water slowly over the embers, and stir until everything is cool to the touch. If you’re using sand or a snuffer lid instead, make sure you double check that everything’s fully extinguished.
And where’s your wood going? Keep it stacked in a dry spot, at least a few feet from the fire pit. A raised rack or covered bin keeps things neat and ready. Bonus: turn your storage into a design feature with a simple wood cradle or rustic crate setup clean, safe, and great to look at.
Wrapping It All Together
Once your fire pit is set, framing it with smart, affordable seating turns the space into a real hangout zone. Skip overpriced patio sets look for stackable Adirondack chairs, salvaged benches, or even DIY stump stools if you want something rustic. Built in seating with retaining wall blocks is another solid option if you want a more permanent look without the price tag.
Next up: lighting. String lights tossed between trees or over a pergola add glow without gunking up the view. Solar stake lights work, too, and don’t need wiring. Pair them with weather resistant lanterns or low profile LED strips along seating edges for extra vibe.
Textiles tie it all together. Think outdoor rugs that handle dirt, cushions that resist sun fade, and throw blankets for evenings when the fire alone isn’t enough. Pro move: stash them in a waterproof deck box for easy access and longer life.
To round out the space like a pro, browse our outdoor lounge guide. It’s packed with no nonsense tips to stretch your setup from good to weekend worthy.
Final Takeaways
Building your own fire pit isn’t some contractor level project. With the right planning, a weekend, and a few basic tools, you can put together something that looks good, works well, and doesn’t drain your savings. The key is to keep it simple: start with a circular or square stone layout, follow the safety basics, and don’t overthink the extras.
You’ll be surprised how much character a fire pit adds to your yard. It creates a destination whether you’re hosting a few friends or just unwinding under the stars. It’s low cost impact at its best.
And you don’t need to do it all at once. Start with the fire pit itself. Once it’s in, layer on more as time and budget allow simple benches, string lights, or a gravel pad. It grows with your space. Just get the flame going first.
 Quenric Drovayne writes the kind of home and garden trends content that people actually send to each other. Not because it's flashy or controversial, but because it's the sort of thing where you read it and immediately think of three people who need to see it. Quenric has a talent for identifying the questions that a lot of people have but haven't quite figured out how to articulate yet — and then answering them properly.
They covers a lot of ground: Home and Garden Trends, DIY Home Projects, Interior Design Ideas, and plenty of adjacent territory that doesn't always get treated with the same seriousness. The consistency across all of it is a certain kind of respect for the reader. Quenric doesn't assume people are stupid, and they doesn't assume they know everything either. They writes for someone who is genuinely trying to figure something out — because that's usually who's actually reading. That assumption shapes everything from how they structures an explanation to how much background they includes before getting to the point.
Beyond the practical stuff, there's something in Quenric's writing that reflects a real investment in the subject — not performed enthusiasm, but the kind of sustained interest that produces insight over time. They has been paying attention to home and garden trends long enough that they notices things a more casual observer would miss. That depth shows up in the work in ways that are hard to fake.
Quenric Drovayne writes the kind of home and garden trends content that people actually send to each other. Not because it's flashy or controversial, but because it's the sort of thing where you read it and immediately think of three people who need to see it. Quenric has a talent for identifying the questions that a lot of people have but haven't quite figured out how to articulate yet — and then answering them properly.
They covers a lot of ground: Home and Garden Trends, DIY Home Projects, Interior Design Ideas, and plenty of adjacent territory that doesn't always get treated with the same seriousness. The consistency across all of it is a certain kind of respect for the reader. Quenric doesn't assume people are stupid, and they doesn't assume they know everything either. They writes for someone who is genuinely trying to figure something out — because that's usually who's actually reading. That assumption shapes everything from how they structures an explanation to how much background they includes before getting to the point.
Beyond the practical stuff, there's something in Quenric's writing that reflects a real investment in the subject — not performed enthusiasm, but the kind of sustained interest that produces insight over time. They has been paying attention to home and garden trends long enough that they notices things a more casual observer would miss. That depth shows up in the work in ways that are hard to fake.